Teak is a tropical hardwood — a dense, oily wood that grows in Southeast Asia and earns its reputation as the gold standard of outdoor furniture because it contains natural oils and silica that resist rot, insects, and weather without much intervention from you. Unlike pine or cedar, which need annual sealing or they’ll start to crack and splinter, teak is genuinely low-maintenance. But “low-maintenance” doesn’t mean “zero-maintenance.” A $2,000 teak dining set that gets ignored for five years will still be structurally sound — but it’ll look chalky, gray, and neglected in ways that are harder to reverse than if you’d spent two hours a year on it. This guide walks through the annual routine that keeps a quality teak set looking intentional and well-loved, not abandoned, and helps you decide which optional treatments are actually worth the money versus which ones you can skip entirely.
What Actually Happens to Teak Over Time (and Why It Matters)
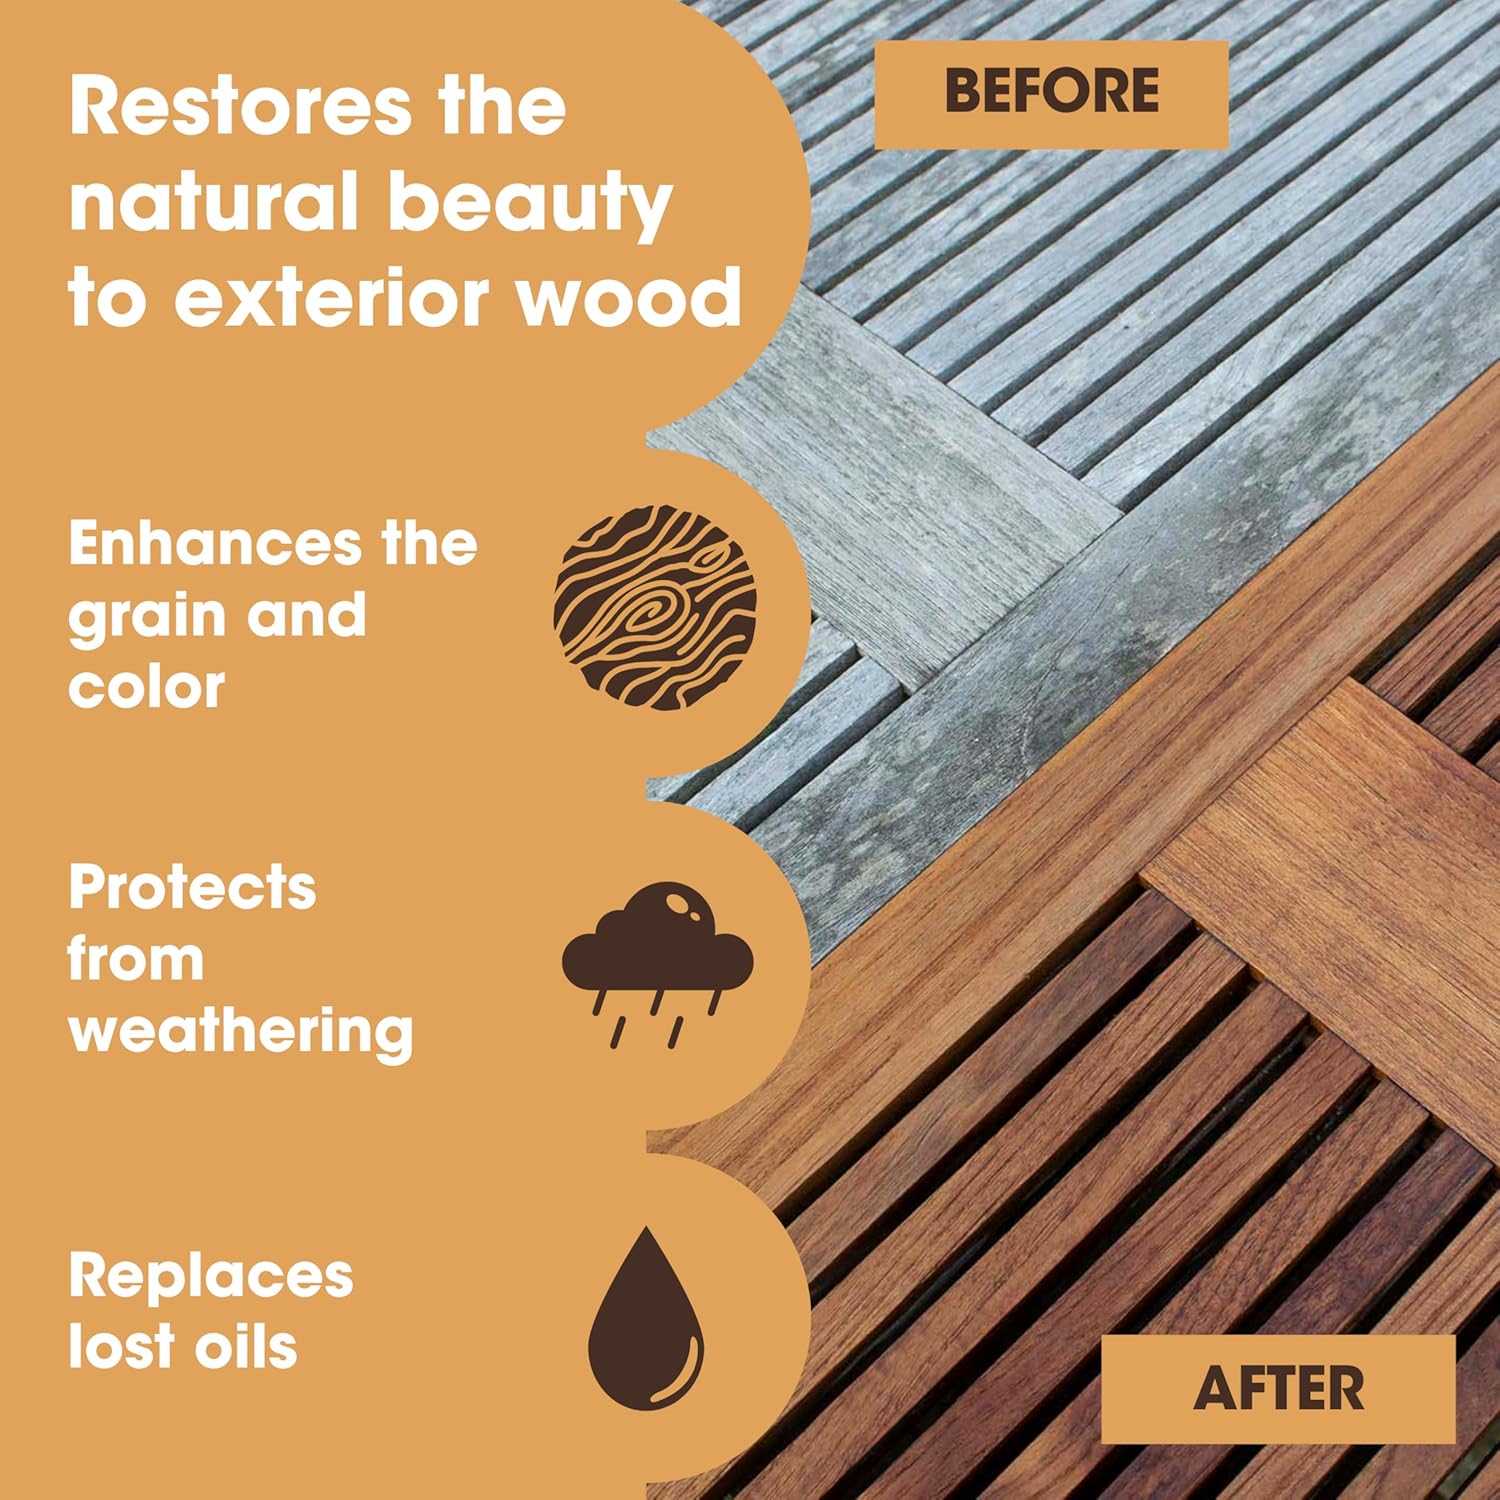
When teak is freshly milled or newly purchased, it’s a warm honey-gold color. That color comes from natural oils sitting close to the wood’s surface. Within three to twelve months of outdoor exposure — depending on your climate — UV light (ultraviolet radiation from the sun) oxidizes those surface oils and teak turns silver-gray. This is not damage. The wood is not degrading. The gray patina (a surface color change caused by oxidation) is chemically stable and actually indicates the wood’s oils are doing their job.
Here’s the decision every teak owner faces:
Option A: Let it gray naturally. This is the classic “teak look” you see on traditional sailing vessels and Nantucket porches. Zero product cost, minimal labor, genuinely durable. The tradeoff is aesthetic — some owners love the gray; others feel like the furniture looks old.
Option B: Maintain the golden color with annual cleaning and oiling. This is more work and more product spend, but reviewers who do it consistently describe results that look “like the set just came out of the box” even five or six years in, per owner communities tracked by Gardenista’s editorial team.
Option C: Apply a teak sealer instead of oil. Sealers (penetrating protective coatings that resist UV and water) are lower-maintenance than oil because they don’t need to be reapplied as often, but they lock in whatever color the wood is at application time — including gray, if you wait too long. More on this below.
Most owners regret choosing without understanding these three paths first. Pick your preferred outcome now, and the maintenance routine writes itself.
The Annual Maintenance Routine, Step by Step
This routine applies whether you’re maintaining the golden color or refreshing gray teak back toward honey. The cleaning phase is identical; the treatment phase diverges.
Step 1: Clean First — Always
Every teak care cycle starts with cleaning, full stop. Applying oil or sealer over dirty teak traps mildew spores, tannins (the dark organic compounds teak releases when wet), and surface debris under the finish, creating a blotchy, uneven result that reviewers across multiple product categories consistently describe as “streaky” or “worse than doing nothing.”
What you need:
- A soft-bristle brush (not wire — wire scratches the grain)
- Teak cleaner solution or a diluted mix of oxygen bleach and water
- Garden hose with gentle pressure
The process: Wet the furniture, apply cleaner, scrub with the grain (along the direction of the wood’s natural lines, not across them — cross-grain scrubbing raises fibers and leaves a fuzzy surface), rinse thoroughly, and let it dry for a minimum of 48 hours before any treatment. The 48-hour window is non-negotiable. This Old House’s wood finishing guidance emphasizes that applying oil to wood that still holds moisture traps water vapor beneath the finish, which causes peeling and graying within months rather than years.
Step 2: Sand if Needed (Every 2–3 Years, Not Annually)
If your teak has been sitting gray for more than one season, or if the surface feels rough and splintery, light sanding before treatment makes a significant difference. Use 120-grit sandpaper, always with the grain, followed by 220-grit to smooth. Wipe away all dust with a tack cloth before proceeding.
Sanding is not part of every annual cycle. If you cleaned last season and the wood still feels smooth, skip this step.
Step 3a: Apply Teak Oil (If You’re Maintaining the Golden Look)
Teak oil — technically a blend of penetrating drying oils, often linseed or tung oil, sometimes with UV inhibitors added — soaks into the wood and temporarily replenishes the surface oils that UV has degraded. Key word: temporarily. In full-sun climates (Florida, Arizona, Southern California), owners report reapplying every 4–6 months to maintain color. In moderate climates (Pacific Northwest, New England with real winters), once annually is often sufficient.
Application: Use a clean cloth or foam applicator, work in the direction of the grain, apply a thin even coat, let it penetrate for 15–20 minutes, then wipe off excess. Pooled oil that isn’t wiped off becomes sticky and attracts dirt. Two thin coats outperform one heavy coat.
The honest trade-off: Teak oil does not improve the wood’s durability — teak is already durable. It’s purely aesthetic maintenance. If you stop oiling, the wood grays and stabilizes. Nothing structurally bad happens.
Step 3b: Apply Teak Sealer (If You Want Longer Intervals Between Treatments)
Teak sealer is a different product category from teak oil. Sealers use polymer-based formulations that cure on the wood’s surface and block UV penetration more effectively than oil. Well-reviewed sealers extend the interval between applications to 12–18 months even in high-sun climates, per owner reports aggregated in Architectural Digest’s teak maintenance coverage.
The catch: Sealers must be applied to clean, dry, ideally lightly sanded teak. And once applied, switching back to oil requires stripping the sealer — which means a dedicated cleaner and another round of sanding. Sealers are not reversible on a weekend whim.
If your teak has already grayed and you want to restore color before sealing, use a two-part teak restoration kit (Part A is an oxalic acid brightener that lifts oxidation; Part B is a neutralizer) before the sealer goes on. This step is worth the extra hour.
By the Numbers
| Path | Product Cost Per Year | Active Labor Per Year | Reapplication Frequency |
|---|---|---|---|
| Let it gray naturally | $0–$15 (cleaner only) | ~1 hr | Annual clean only |
| Oil maintenance | $30–$60 | 2–4 hrs | Every 4–12 months |
| Sealer maintenance | $40–$80 upfront, ~$20/yr after | 3–4 hrs (Year 1), ~1.5 hrs after | Every 12–18 months |
The Cushion and Cover Math (The Cost Most People Miss)
When calculating the true 5-year cost of a teak set, the furniture itself is only part of the picture. Replacement cushions for a 6-piece teak dining set typically run $200–$600 depending on fabric grade, and outdoor cushion fabric (solution-dyed acrylic — meaning the color is baked into the fiber, not printed on the surface, which makes it far more fade-resistant) matters as much as the teak itself.
Sunbrella, an industry benchmark for outdoor upholstery fabric, publishes performance standards showing solution-dyed acrylic fabrics maintain color fidelity significantly longer than polyester alternatives under UV exposure. Gardenista’s outdoor living coverage echoes this finding, noting that owners who cheap out on cushions and replace them every 2–3 years often spend more over a decade than the furniture itself cost.
The five-year cost reality for a $2,000 teak set:
- Furniture: $2,000
- 2× cushion replacements (if using low-grade fabric): $400–$800
- Annual maintenance products: $150–$300 over 5 years
- Quality outdoor furniture cover: $80–$150
- Realistic five-year spend: $2,630–$3,250
With solution-dyed cushions and proper covers, cushion replacement drops to once in five years (or zero), pulling that range down by $200–$400.
Sourcing and Grade: What to Check Before You Even Start Maintaining
If you’re still in the buying phase — or evaluating a set you purchased but haven’t researched fully — teak quality varies significantly by grade and sourcing, and it affects how the wood responds to maintenance.
Grade A teak comes from the heartwood (the dense, oil-rich center of the tree) and is what premium outdoor furniture is made from. It has tight grain, minimal knots, and a high natural oil content that makes maintenance easier and results more even.
Grade B and C teak includes sapwood (the outer, younger wood) and plantation wood of variable density. It’s not structurally inferior, but it has less natural oil content, which means it gray more quickly, absorbs oil unevenly, and may show more variation in color response.
The Forest Stewardship Council (FSC) certification — a third-party label indicating the wood was harvested from responsibly managed forests — doesn’t speak to grade, but it does indicate supply chain accountability. Reputable teak furniture brands, including many found at specialty outdoor retailers, will specify both FSC certification and grade A heartwood construction in their product documentation.
Storage and Winter Prep
Teak doesn’t need to come indoors for winter in most North American climates — it genuinely handles freeze-thaw cycles better than most materials. But two habits extend its life and appearance meaningfully:
-
Cover it or store cushions. Teak can handle rain and snow. Cushions cannot. Even Sunbrella-grade fabric develops mildew if cushions stay wet and compressed under a cover that traps moisture rather than breathes. Breathable outdoor covers (vented, not sealed-bag style) are worth the $80–$120 investment.
-
Clean before covering, not after winter. Mildew starts from organic debris — leaves, pollen, bird droppings — trapped under a cover. Ten minutes of brushing off the set before you put the cover on in November saves an hour of cleaning in April.
If X, Then Y: The Decision Rule
If you love the silver-gray patina look: Do an annual clean with teak cleaner and a soft brush. Skip oil and sealer entirely. You’re done in 60 minutes. This is completely valid, structurally sound, and the preferred finish for traditional outdoor aesthetics.
If you want to maintain the golden color with minimum commitment: Use a quality teak sealer (not oil) in year one, applied to freshly cleaned and lightly sanded wood. Reapply every 12–18 months. Higher upfront effort, lowest ongoing labor.
If you want maximum color richness and don’t mind a twice-yearly habit: Oil every 4–6 months in full-sun climates. Accept that this is an ongoing relationship with the furniture, not a one-time fix.
If your teak has gone gray and you want the honey color back: Budget a weekend. Use a two-part restoration kit, light sand with 120-grit and 220-grit, then apply sealer rather than oil for better longevity. Trying to shortcut the restoration step and going straight to oil on gray wood produces results that reviewers consistently describe as “muddy” rather than golden.
The furniture will outlast the decade either way. These choices are purely about which version of it you want to live with.